Wednesday, 25 September 2019

Pauline & Alice Serra Jacket


Can't believe it's been 8 months since my last post. These days I'm more active on Instagram, but when I really want to document a project more thoroughly, blogs are still where things are at.

I had bought 3 yards of Rag & Bone Olive Stretch Twill from Mood Fabric in March on their 'Green fabric sale' day - impulsively, I regret to say. But I did need a light jacket for transitional weather, so I started collecting inspirations.
Snapshot of my Pinterest board

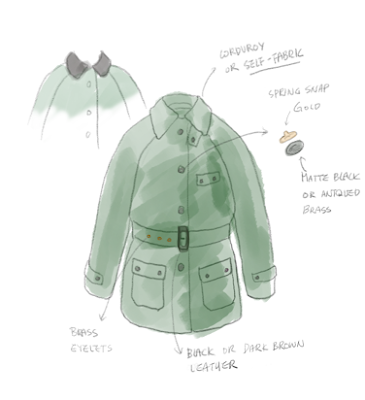
It took me forever to decide on the details but in the end this is what I came up with. I hoped the gold snap buttons inside and the black corduroy collar would make it look more like an adventurer jacket than an army uniform.


For the sewing pattern I chose Pauline & Alice's Serra Jacket, because of the sheer number of options it offers, and I wanted a detachable hood and raglan shoulders and the pattern fitted the bill perfectly. I wanted to combine the views A and C and watching the P&A's online tutorial in hacking the pattern was crucial  - otherwise I wouldn't have known I had to extend the neckline for C.

I made a muslin of size small as I was going for a boxy fit, which fitted well except I had to make some narrow shoulder adjustment (not enough as it turned out to be). I also made multiple construction changes including:
  • Making sleeves two pieces - this was easy, as I just had to cut from the shoulder point, smooth the lines, and added seam allowances.
  • Making back two pieces - again, straightforward. I just added seam allowances to the back piece.
  • Using reverse flat felled seams for all seams - next time I'll do proper flat felled seam.
  • Interfacing the hems of the jacket
  • Making it buggy-lined - for this I referred to my jacket making bible, Tailoring. It entailed drafting front facing to extend to the side seams and creating a half lining piece for the back. 

Modified front-facing
From left to right, Even feed walking foot, Stitch in the ditch, and the default foot

Since I plan to sew more jackets, I invested on some sewing accessories. It was my first time using foots other than the plain default foot or the zipper foot, and I was amazed at how much differences they made. My edge stitching definitely improved thanks to the foot.

I tried lots of techniques for the first time in making this jacket; first buggy lining, first snap buttons, first zipper placket, and least but not last, first pad stitching. I used muslin scraps for interfacing, and used the opportunity to practice pad-stitching. I'm not proud of the stitches, but they hold the muslin and the fabric, and don't show on the outside, so I'm pleased. I also like the fact that I found uses for old muslin pieces. It's more environmentally friendly too. Moving forward I plan to use it more for medium weight interfacing.
I used muslin scraps for interfacing, pad-stitched with Gutermann cotton thread

And here's the finished jacket! I'm so so pleased with the result.
With the hood closed. The buttons actually align, if you look at it from a certain angle. :p

The back and the sleeves are modified into two pieces.

For the first time, I'm not embarrassed to show the inside of the garment I made.

Buggy lined back. There's even a hanging loop!
This jacket begs to be styled with binoculars.

What's my verdict on the pattern? Two thumbs up! The instructions are on the light side so I had to refer to my Barbour jackets and the Tailoring book to figure out lots of things. Definitely not for beginners. But the classic style, easy fitting, and lots of options make this pattern a great investment. I'm already dreaming of making a mix of B and C in brown corduroy.

But next time:
  • Remove extra fabric around front shoulder seams to make shoulder narrower (or just make a smaller size)
  • Change the pocket to cargo or box pleat pockets, if making a similar style jacket.
  • Reduce hood depth.
  • Invest on a better zip, maybe. The one from Joann isn't very smooth.
  • If making unlined or partially lined, shorten the hem facing so that the stitching line is close to the hem binding (see the picture below).
Should have shortened the hem. This was highest I could go without overlapping with the pockets.
This is a milestone in my longer term goal of making a custom tailored tweed jacket, and I think I'm better equipped in terms of my skill sets thanks to sewing this jacket. It isn't 100% finished yet. I still need to make the belt, and I might add a breast pocket after all. But I'm ready to start wearing this right away (weather permitting)!

And now to figure out what to do with the other olive cotton fabric I impulsively bought the same day...

Sunday, 27 January 2019

2019 Craft Plan

I have long learnt not to bother making new year resolutions. But I am determined to do one thing this year - not to buy any more yarns until November. Why November? That's because yarn companies generally do big sales around that time of year, and it'll be a gross negligence on my side to miss the chance. :p

I haven't been spending as much time tinkering these days. It's because of this furry creature.
We adopted her from Humane Society Silicon Valley late last year. She's a cattle dog mix and is super energetic. Before she joined our household I used to spend most of my evening knitting - that's at least 3 hours a day - but these day I'm lucky if I get 30 min. She's still worth it though, at least that's what I'm telling myself. Not being able to tinker to my heart's content is tough and I'm hoping once she's matured I'll have more time for myself.

Despite all this, I did finish a jumper. Woohoo!
I loosely followed Alouette which is a 1940s pattern reinterpreted by Sarah Dallas, but incorporated the neckline and the back zip from a 1960s Fan and Feather sweater pattern. The bodice of Alouette doesn't have any shaping, so it is boxier than what I'd expect from a vintage sweater. I think it'll be a nice project to use up my odds and bits of fingering yarns but next time I'll add a bit of shaping.

It was the first time I used a zip closure for the neckline. It's a detail I see on vintage jumpers especially from the 50s and 60s, and I always wanted to try it out. This being a lace pattern, I thought a zip would work better than button closure and it wasn't as difficult as I thought it was going to be. I followed the zipper tutorial on Purl Soho and it was pretty straightforward. I think I'll use this technique more often from now on.

Now to the plans for 2019! The focus will be on using up my stash - I inventoried my stash using the 'Stash' feature in Ravelry and it really shed light on just how much yarn I've got. So, the first is this 1950s jumper called 'Bobble Pullover' that I'm going to knit with a Drops Alpaca yarn that I had in my stash for just over a year. It'll go nicely with my rust colour skirt.

The second is a slip stitch jumper to re-create something like the jumper that the girl on the right is wearing. I discovered from my previous slip stitch jumper project that this kind of pattern is great for stash-busting and keeping things interesting.

And last but not least, I should use up the yarns I dyed with avocado. I'm thinking to make another Kasha cardigan with the yarns but I may end up just knitting a plain v-neck jumper.

This is on top of a sewing projects that I have in mind. I want to make a shirt and a jacket - not ambitious at all. What with the puppy and everything, I'm not sure how much of these I'll get done. But one shall endeavour!

Sunday, 16 December 2018

Avocado dye - the successful version


I don't quite remember when I first became aware of avocado dye. I think when I was searching for food colouring dyeing I accidentally came across it. In any case, dusty rose/salmon is one of my favourite colours, I like making do, and I like experimenting so I had to give it a go.

I tried avocado dyeing before with a lukewarm result. I used 100g 100% pure lambswool yarn, mordanted it with about a teaspoon of alum overnight, and dyed for 2 days. I think I used pits and skins from about 7 avocados. It turned out to be murky light peach colour, which I still liked but wasn't too impressed. The yarn also felted a little and got scratchy.  But it was okay because I got the yarn for free and it was my first try.

Fast forward a year, I got bitten by a dyeing bug again. Particularly I wanted to make another version of Kasha, in a colour that flattered me better. So I decided it was time to try avocado dyeing again.

This time I decided to be more thorough because I was going to dye a large quantity of yarn so the stakes were high. I looked at some bare yarns from Knitpicks and Craftsy, and noticed that Craftsy were doing 50% off sale on their Superwash Merino Superwash Sock Twist yarns, which was actually cheaper than their bare yarn bundle. I ordered 4 skeins (400g total) of colour Ecru. I went all the way and even bought some PH strips.

Mordanting
This time I put a bit more effort in mordanting the yarn. Previously I only used alum, but this time I used alum and cream of tartar. I used 1 tbsp alum and 1 tsp cream of tartar per skein. I brought the temperature to about 85 degree centigrade (185 fahrenheit) and kept the temperature overnight by swaddling the pot (see below).

Dyebath
The main difference I made this time was the amount of pits I used. Thankfully the kitchens at my workplace process humongous amount of avocados each day for guacamole and other avocado goodies for the cafes, and I asked nicely if I could get my hands on some of them. I asked for 40 pits - 10 pits per 100g skein for the first bath. In total I used 80 pits, because I had to dye the yarns twice to get the colour above. The wonderful staff at work cafes was very indulging to put up with my weird requests.
I chopped them up and added about 6 avocado worth of skins and brought them to simmer (about 85 centigrade) at which point the dye bath looked murky brown. I added about 2 teaspoon of washing soda and simmered some more which turned the dyebath dark pink. The PH strip read 11.

I extracted the dye over 2 days (2 simmers per evening). In order to save energy, I turned off the gas after it reached the temperature and swaddled the pot. It's a trick I saw in 'Wartime Farm' which I watched only about 8 times now. The folks used to bring a stew to boil, and then put the pot in a haybox to continue cooking to save fuel during the WW2. How clever is that! I put a merino wool jumper that I only wear in the house, 2 bath towels, and put a t-shirt over it to hold them. I swaddled the pot, and went to bed. The pot was still warm the next morning.
Meanwhile I kept the yarn submerged after rinsing the mordant because I wanted to achieve as even dye as possible. Once I deemed the dye bath ready (it looked as dark as it was going to get but I think I could have extracted more dye), I ladled the dye stuff out and put the yarn in.
Once again I brought it to simmer (85 centigrade), swaddle, let it cool down, and repeated it about 4 times over 2 days. At that point the dye bath became paler (picture below), so I took the yarn out.


I loved the colour of the yarn when I first took it out, but I underestimated how much lighter it was going to get once it dried.
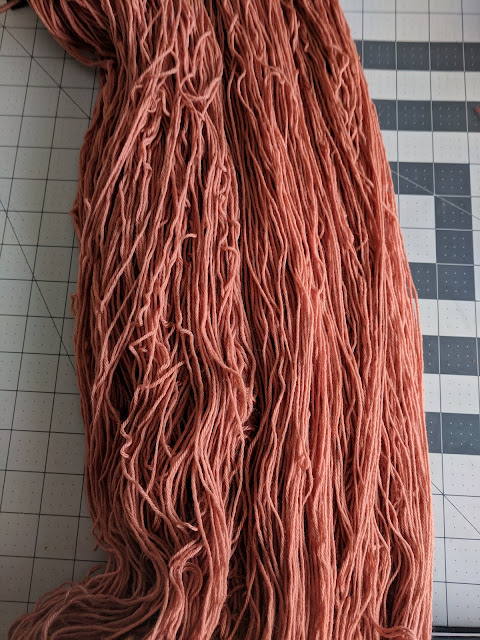
The above was the result of the first dye, once it'd fully dried. The colour was beautiful salmon, but not quite as dark as I had hoped for the particular purpose. I also saw minor irregularities in the dye, because there was some dye stuff left in the pot which darkened the parts of yarn that it adhered to. After much deliberation I decided to over-dye it with more avocado.

2nd dye
I asked for another 40 avocado pits, and basically repeated the same process, except I simmered the dye bath about twice more which made the dye bath even darker. I didn't bother mordanting the yarn again. And this time I actually took the trouble to sieve the liquid to thoroughly remove the dye stuff.

The dye bath looked almost black. I brought the yarn to simmer about three times and took it out as I didn't want to make the yarns too dark.
And voila, I managed to get deep desaturated rose colour out of avocado. To be honest, I wish it had a bit more orange and brown in it, but I'm perfectly happy with it. There are many factors that might have contributed to the better result. 1) The yarn was merino, 2) it was superwash, 3) I added cream of tartar on top of alum for mordanting, but 4) perhaps most importantly I used tons more avocado pits for this batch. The dyebath still had a lot of dye left in it, so I ordered some more yarn to dye another batch.

Tldr; here's the summary.
Yarn: 4 x 100g skein Craftsy Cloudborn Merino Superwash Sock Twist Yarn. 80% Superwash merino wool, 20% poly.
Mordant: 4 tbsp alum + 4 tsp cream of tartar
Dye stuff: In the end I used in total about 80 avocado pits and 6 avocado skins
Dye bath: Dyed twice. Brought to simmer to 85 degree centigrade, followed by swaddling and cooling until it reached desired strength - until the dye bath looked almost black. Reached PH level 11 by adding 2 tsp washing soda (per dye bath) after the first simmer. I made the washing soda by baking baking soda in the oven at 400 for an hour. There was a lot of dye left in the second bath. I might have achieved the same result by using about 60 pits and exhausting the dye. 
Learnings: 
  • Sieve out the dye stuff thoroughly before putting yarn in to prevent dark spots
  • Use the swaddle method (?) to save energy
  • Tie the skeins in 2 additional places to prevent tangles
Since this turned out to be a success, I'm thinking to try my hands at other natural dyes. I like to reduce my carbon footprint whenever possible and living in California where we get about 2 weeks of rain per year if we're lucky, the amount of water needed to dye yarns always makes me feel a little guilty, but I do my best to reuse and save. I have my eyes on brown onion skin dye and I discovered some lichen growing in the back yard just this morning. Oh the possibilities! I should order more yarns.

Sunday, 2 December 2018

Golden Kasha and sewing buttonholes after the fact

I thought I'd never be done with this cardigan. Not only was the lace pattern fiddly (with 5 to 1 on purl side), but it needed lots of parts to all come together. But I'd say it was all worth it. It's one of my proudest knitted creation.
One of the reasons it took so long to complete is because I forgot to make the button holes as I was knitting the front. To be more precise I thought I was knitting the right front when in fact I was knitting the left and only realized the mistake about a half way through. 
I deliberated until the end whether I should make the cardigan snap closure or figure out to make the button holes afterwards. In the end, to keep the details authentic I chose to try making it button closure.

I discovered after thought buttonholes on the internet, but I didn't think the 5/8 width ribbon I used to back the band was wide enough to accommodate horizontal buttonholes. Also having to snip a stitch scared me and I was worried I'll ruin the whole thing. After much deliberation I decided to sew the buttonholes directly on the ribbon backed button band. After all, that's how people make buttonholes on knitted fabrics, so it should be doable, right?

I did practice first with a scrap ribbon and an extra button band that I knitted up for this. I just hoped it'll look neater when it's done with a matching ribbon and thread.

Being ever so impatient, I decided I was ready to go with the real deal. I backed the band with ribbon first, and then marked the positions. And then I ran them on the sewing machine one by one.
I did notice that the thick knit snagged the buttonhole foot, making it miss the turn. To mitigate, I sewed extra stitches around the button hole position (after painfully picking a couple of button holes).

It all worked out alright in the end. I'm so pleased with the result that I'm wondering whether this should be how I make button holes from now on, since it's deucedly difficult to space them correctly while knitting. It's also much sturdier.

I also tried making the shoulder pads as directed in the pattern. But alas, they looked great on the dress form but not on human. Next time I try something like this, I'll knit one side first, try it on properly, and then knit the other one to prevent wasting time and yarn.

The pattern is clever in that when it's sewn up, the diamond lace parts fit together like puzzles and look seamless.

Overall, it was great experience. I tried a bunch of new skills - backing button bands, sewing button holes directly on the knitted garment, and making shoulder pads even though it didn't get used. This is going on my Etsy shop as the yellow doesn't look good on me, but I'm thinking to make another one for myself with the yarns I dyed with avocados.

You can see more details of the project on Ravelry.

Tuesday, 30 October 2018

Claret Clara

Clara had been all finished but for the buttons for a few days. Finally, last night when I got back from work I spotted a package from Etsy waiting for me. It's always a gamble to buy buttons online, but all the buttons I could find offline weren't exactly right. 
Thankfully, these ones worked out perfectly. The buttons are translucent dark brown colours which aren't too dark or too bright, and it compliments the vintage feel of the jumper.

Looping the buttons was much more challenging than I expected. I started by knotting them, but it came undone too easily. In the end I braided the yarns, and then sew the ends in. It doesn't look as neat as I had hoped, but it's sturdy.
I kept all the details in the pattern such as the tabs, but made the bodice slightly longer to make it easier to wear. The original pattern called for 11" but I lengthen it to 14". That was the only modification I made, and I'm very happy with the result. This will go up on Etsy like most of my creation nowadays. I'll write about my motivations for doing that some other time. 

Wednesday, 24 October 2018

Clarel, Kasha, and introducing my new friend

Even though I haven't really finished any projects, I wanted to log some updates since I haven't posted anything for a while. I do try to post at least once every month.

I have been out of town for the last 3 weeks, and what glorious 3 weeks they were. I was at a conference in Denmark for a week, followed by 2 weeks holiday in England. One thing I missed a lot was English countryside, so Sean and I did lot of hiking in Peak district and Cornwall. I love moorlands, and poor Sean had to tag along to 3 different moors. Below was Bodmin moor, which I didn't want to ever leave.
Much as I love the country, I wouldn't visit England without visiting London. I splurged at Liberty and bought 3 different Tana lawn. Now I have too much Tana lawn in my stash which I suppose is a good problem to have. The one on far right is a rayon I bought from Sew Over It. I'm thinking to make Sean a shirt with the green lawn on the left.
On knitting front, I'm making good progress on my latest knitting project. I found this Clarel jumper pattern on Free Vintage Knitting some time ago, and was instantly smitten. I envisioned it in tweed green or brown, and it had been in my queue for ever so long. In the end, instead of buying new yarn I used Drops Alpaca Tomato that had been in my stash for over a year. It's my first cable project, and I can see why people love this technique.
Eek look at all the ends! I've ordered some ball buttons from Etsy, and cannot wait to see whether they go well with the jumper. The tabs are just placed on top, not sewn in yet. The sleeves were as always a pain, and I had to redo the sleeve head 3 times, but at last they're done and being blocked. This will make a nice Christmas jumper.

I'm also making headway with Kasha. Pictured below with another Liberty fabric in my stash.
When I started the project I was intimidated by the lace pattern. I thought I would never get the hang of it and feared I'd have to refer to the chart for every row. Well yes, I do have to refer to the chart for every row, but the lace pattern is surprisingly memorizable. The danger is when you begin to think you got it and start to relax. That's when the mistakes inevitably happen.

And last but not least, a small cause of excitement - I finally bought a dress form! I've been stalking Craigslist since last year, and finally spotted one that fitted the bill perfectly. I don't think I'll use it for fitting, since the measurements are 'a little' different from mine (the ridiculously small waist, for one). But my goodness, is it fun to model my handmade items on it. They look 10+ times better than on me.


Friday, 14 September 2018

Shetland Slipover: My first steeking

Steeking had been one of those techniques that I always thought about with a bit of dread and a sense of obligation. Obligation because as a fairly frequent fair isle knitter, it's something I felt I just had to try. I decided this complex fair isle was as good a chance as any, so bit the bullet and had a go at it.

I followed the (very minimal to say the least) instruction of Hillhead Slipover, and cast on additional 12 sts for steeks. At fist it felt as if I was overdoing it, as most instruction for steeking I found online had 5 additional sts, but later on I was very thankful for those generous additional sts.

As for steeking and picking up stitches, I found this instruction by Quince & co easiest to follow. Diagrammes FTW.


It did look quite a mess after I cut the steeks. And this was when I really saw the value of those generous extra sts.


I couldn't find detailed tutorial for finishing steeks. This article has good inventory of all the options, but is rather slim on the actual 'how to do it' part. In the end I chose to finish the seams with blanket stitches. It does the job, but it's not the tidiest finish, so I think I'm going to try my hand at faced finish next.

So what's the verdict?
On the debit side, Reinforcing, cutting, and finishing the edges was a pain. Although cutting the stitches was quite satisfying in a wrong way. And I won't be able to frog and reuse the yarns.
On the credit side, not having to purl the fair isle was a big big plus and it's this that has me convinced that steeking is the way to go.

It was a labour intensive but satisfying project. The pink and yellow yarns were hand-dyed, with avocado and food colouring which made this project even more rewarding.